With over 1 billion energetic clients, Instagram is probably going one of many biggest social media networks to advertise what you might be selling, attain new audiences, and develop mannequin consciousness. So even within the occasion you aren’t energetic on the internet web site however, it’s certainly not too late to undertake an Instagram method in your promoting and advertising plan.
While you’re ready to start sharing content material materials by way of this channel, now we have bought you coated. Proper right here, we’re sharing a quick-and-easy info to posting on Instagram, to be sure you can begin attracting the attention of your viewers with Instagram promoting and advertising.

Posting to Instagram continuously will assist firms uncover resonance with their viewers and develop larger, nonetheless doing it correct is just as crucial. Right here is the proper option to put as much as your Instagram account step-by-step.
Step 1. Faucet the + icon on the excessive of your show display.

See that plus sign [+] inside the image above? That’s your home to start. Click on on that plus sign and you can be ready for the next step, beneath.
Step 2. Choose {a photograph} or video out of your library or shoot one inside the app.
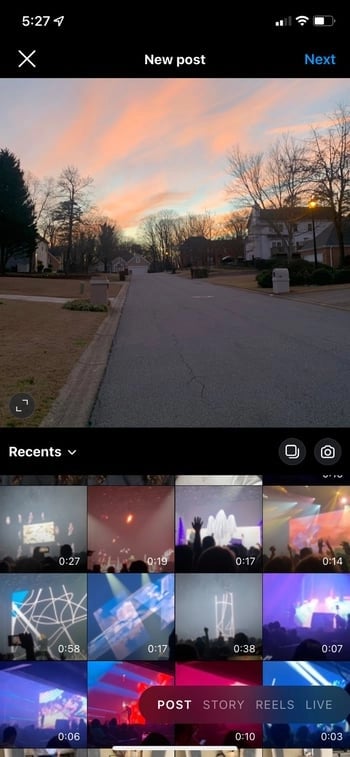
Instagram will current you the pictures already saved to your cellphone. Choose a type of to place up. Alternatively, it’s possible you’ll click on on on the digital digital camera icon to take {a photograph} or video contained in the Instagram app itself, within the occasion you shouldn’t have already bought an image you want to use.
As quickly as you select and crop an image (or carousel of a variety of footage), click on on the Subsequent button inside the excessive correct nook of the app.
Step 3. Publish a variety of footage on Instagram.
Do you might have a variety of photographs and want to highlight all of them? Instagram enables you to try this with its carousel operate.
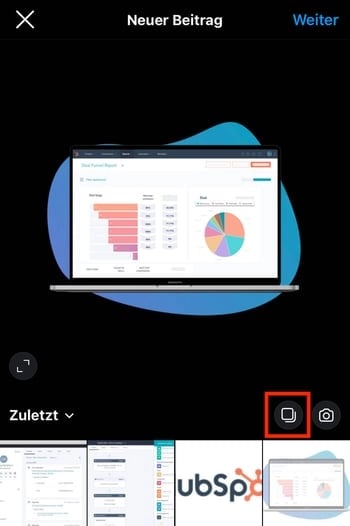
As you go to faucet {a photograph} or video, first faucet the icon merely above your photographs to the suitable that seems like stacked squares. While you faucet this, you might even see a amount on the nook of every image or video you faucet. This amount notes the place the content material materials will current up inside the carousel.
Step 4. Crop the image.
You aren’t restricted to solely a sq. image on Instagram. It’s possible you’ll actually share horizontal or vertical footage as successfully. To get additional of your image seen, pinch the show display of the {photograph} you’ve got bought chosen on the Library show display (play the video beneath to see it in movement).
However, whereas Instagram does allow vertical and horizontal selections, the images nonetheless wish to go well with into some explicit dimensions. So, you may nonetheless should crop a tiny little little bit of your {photograph} to get it to go well with.
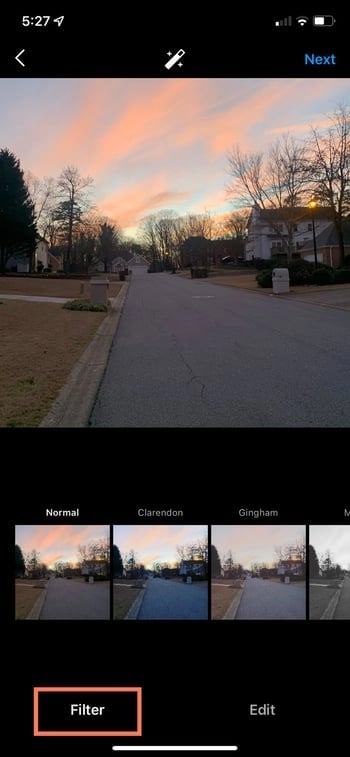
Step 5. Determine a filter.
Instagram affords every kind of filters — scroll to the suitable to peruse your selections, and click on on on one to preview the best way it would look in your {photograph}.
By default, the filter will doubtless be utilized by full power. However, if you happen to want to cut back the depth of the filter, double-click the filter tile as quickly because it has been utilized, and a scale selector will appear, allowing you to downplay the influence.
You’ll be able to too faucet the magic wand on the excessive of the show display to control the {photograph} further.
(Take a look at our Remaining Info to Instagram Filters to be taught additional).
Step 6. Edit your {photograph}.
You’ll be able to too click on on “Edit” on the bottom correct to control the image to your specs.
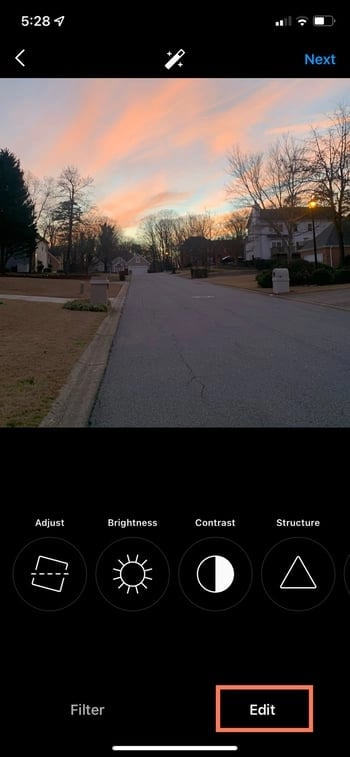
Listed below are the modifying selections that come constructed into Instagram for you:
- Regulate : This helps subtly rotate the image alongside the center plane, giving it a tilt each to the left or correct in response to the linear scale on the bottom of the show display.
- Brightness: This helps lighten or darken the image. All it’s worthwhile to do is pull the selector to the left to darken or to the suitable to lighten.
- Distinction: This helps to increase or decrease the depth of the image’s colors. Pull the selector to the left for a lot much less distinction (a dulling influence) or to the suitable for additional distinction (a greater depth influence).
- Development: This helps in order so as to add an HD-like influence to the image, bringing out explicit particulars in your {photograph}. Drag the selector to the suitable to help the image “pop.”
- Warmth: This helps you alter the temperature of the {photograph}. Drag the selector to the left to increase cool tones inside the image, or drag the selector to the suitable to increase the good and comfortable tones inside the image.
- Saturation: This helps you alter the saturation of the colors in your image. Drag the selector to the left to desaturate the image (all the best way through which to the left if you need a monochrome look), or drag the selector to the suitable for extraordinarily saturated colors.
- Coloration: This affords you various shade selections to overlay over your image for attention-grabbing shade outcomes. Merely select your shade different and see the best way it changes the image inside the preview subject.
- Fade: This softens the depth of the blacks in your image to create an “aged” {photograph} influence. Merely drag the selector to the suitable for a greater diploma of fade.
- Highlights: This helps you administration the depth of the highlights in your image. Dragging the selector to the left will darken the highlights in your image whereas dragging the selector to the suitable will lighten the highlights in your image.
- Shadows: This helps you administration the depth of the shadows in your image. Dragging the selector to the left will darken the shadows in your image whereas dragging the selector to the suitable will lighten the shadows in your image.
- Vignette: This darkens the corners of the image, leaving a circle kind inside the center. Drag the selector all the best way through which to the suitable for most likely essentially the most dramatic vignette.
- Tilt Shift: This helps blur the edges of the image in a radial or linear methodology, drawing focus to the details inside the center of the image.
- Sharpen: This helps sharpen positive particulars of the image, bringing a additional dramatic look to subtler components inside the {photograph}.
Step 7. Type your caption.
Get creative and write a pleasing, attention-grabbing Instagram caption to go along with your {photograph}. Since textual content material will assist optimize your put up in Instagram’s search, writing one factor can solely revenue you.
Step 8. Use hashtags for put up optimization.
With Instagram’s search operate, clients can search by hashtags. So, it is best to ensure that to jot down down associated hashtags in your caption. If anyone does a search of a hashtag you positioned in your caption, they may uncover your put up along with others that included the equivalent one.
Step 9. Tag buddies.
Want your buddy or their followers to see {a photograph} that you just simply posted of the two of you? Tag them!
On the model new put up internet web page, it’s possible you’ll click on on “Tag People” to tag completely different Instagram accounts in your put up. Alternatively, it’s possible you’ll embody their cope with (or their username beginning with an @ picture) in your caption.
Step 10. Add your location.
While you’re on a pleasant journey or at a neat event and you don’t actually really feel like along with that data in your caption, it’s possible you’ll mark the place you are in a single different methodology. On the model new put up internet web page, faucet “Add Location” to put a location in your image (which makes it less complicated for people to go looking out your put up).
If you happen to put up an image or video with a location, it will current up between your determine and the block of content material materials on the feed.
Step 11. Play with emojis.
Emojis are pleasant and may make your caption additional eye-catching. If you happen to acknowledge of some associated emojis that may match collectively together with your put up, stick them inside the caption house. For example, within the occasion you are posting a visit {photograph}, you’ll be able to embody a palm tree ? or a plane ✈️ to point you flew someplace.
Listed below are the best Instagram emojis it is best to make the most of:
- ❤️
- ?
- ?
- ?
- ?
- ?
- ?
- ?
- ?
- ?
However, for sure there’s a multitude of selections in order so as to add aptitude to your posts, from holding it precise ? to the cringe face ?.
Make sure to not go overboard and put up emojis just for the sake of posting them. While you put up a bowling emoji along with {a photograph} of a seashore, that clearly is not going to make sense to people. Equally, within the occasion you place up 20 emojis that loosely relate to a put up, you may merely annoy your followers or come off as decided.
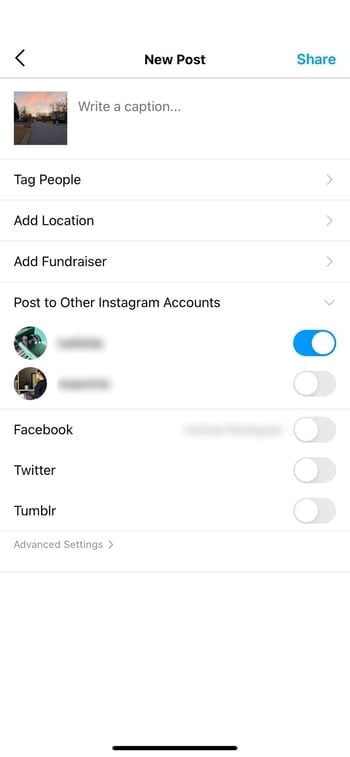
Step 12. Share the put up on completely different social media platforms.
 Lastly, if you happen to want to share your content material materials in your completely different, linked social media web sites (like Fb or Twitter), merely toggle the button from the left to the suitable.
If you happen to’re capable of put up, click on on “Share” inside the excessive correct.
Instagram Saved Drafts
While you’re not capable of put up immediately, you can also reserve it to your Instagram Saved Drafts. Merely return to the filtering and modifying step, faucet the once more arrow inside the excessive left, and select “Save Draft.”
Step 13. Edit the put up.
 Typos happen to all people! While you merely posted one factor and spot a evident spelling error, don’t panic. Merely faucet the three dots that appear on the suitable all through out of your determine, then faucet “Edit.”
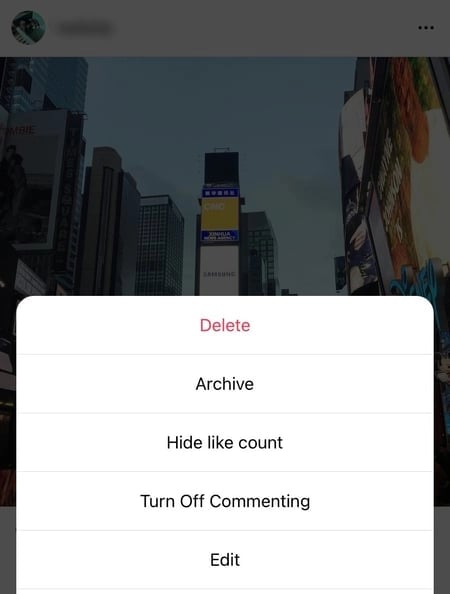
Make the modifications you see match and save them so it shows in your Instagram. In another case, your put up is full and reside for everyone to see.
Skilled tip: Look into the biggest time to place as much as Instagram to learn out of your content material materials.
Develop Your Viewers on Instagram Instantly
Now that you just know how to place as much as Instagram, it’s possible you’ll begin creating content material materials for the platform and connecting collectively together with your viewers. While you’re a enterprise or mannequin, it’s possible you’ll want a steady method for incomes engagement and consciousness.
Editor’s observe: This put up was initially revealed in November 2019 and has been updated for comprehensiveness.